I’ve been branching out a bit from my CNC router use in woodworking and into some heavy metal. Besides Floor and Pallbearer, I’m also talking about aluminum and brass.
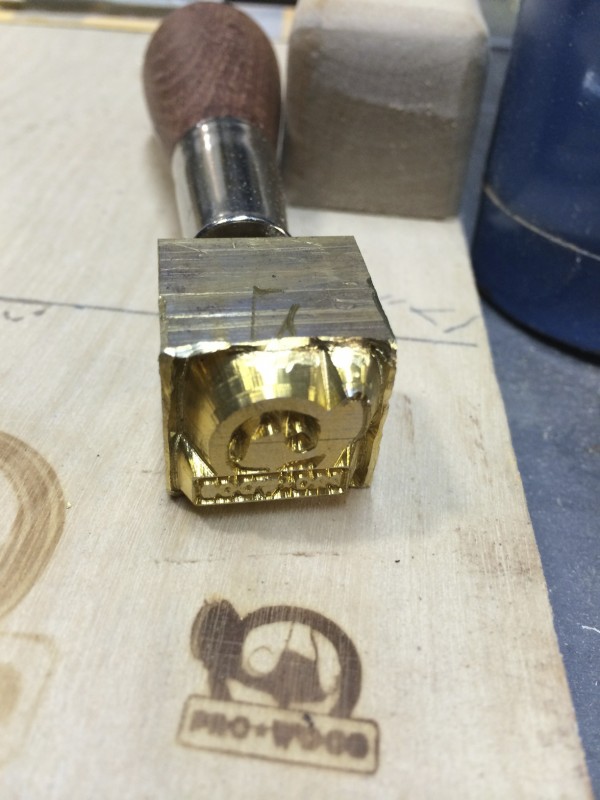
I’ve made a few brass branding irons. I used standard woodworking v-bits with good results. I just make sure I use one of my older bits.
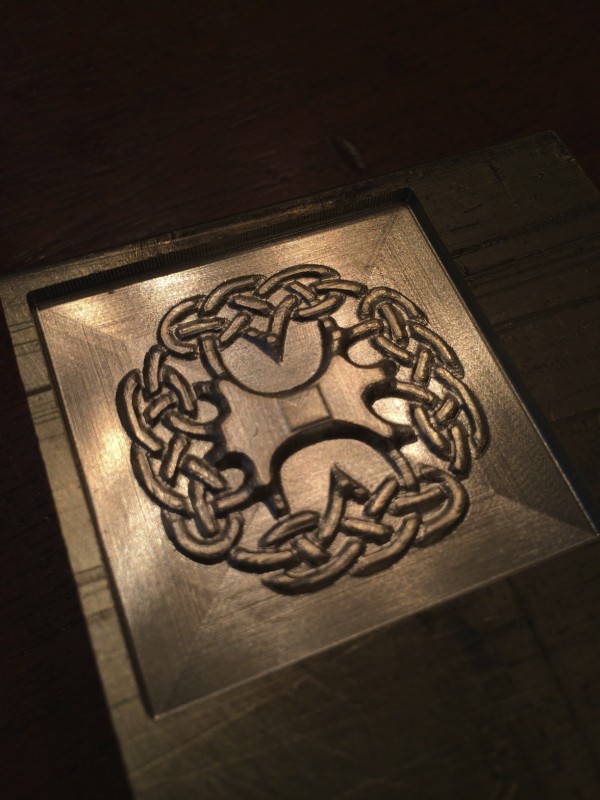
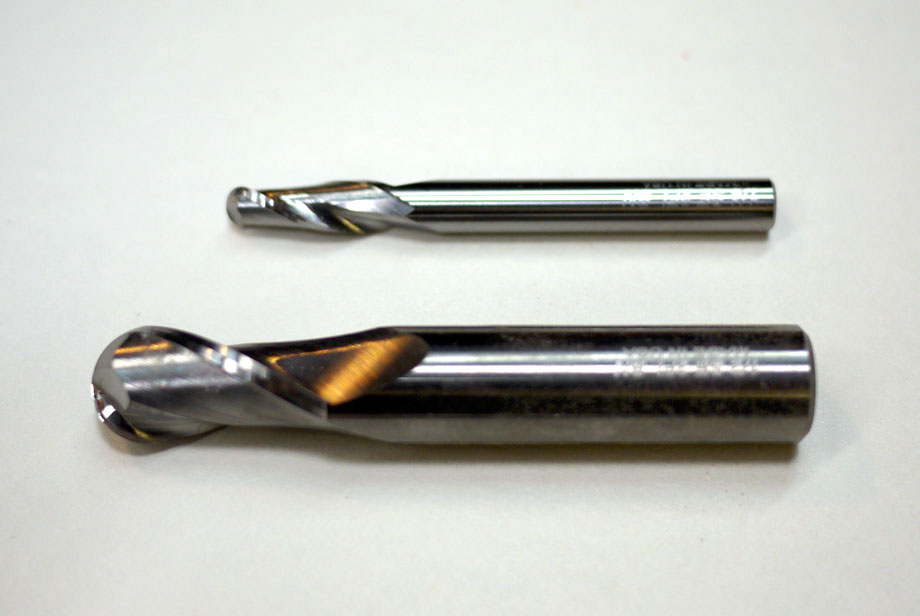
I recently was asked to produce a 3d carved brass item for a client. The item was very intricate and would require a very fine tipped bit. Since I had just performed a few adjustments to the ShopBot to improve accuracy, I knew the machine was up capable of the detail. My questions were related to bit selection and speeds. I started to do some research to find what the experts recommended.
Tapered, ball nose bits with a very small tip are the way to go. Machines like the Carvewright have been delivered with this kind of bit since their inception. The main reason is that they perform quite well on the small scale carving that is generally performed on these machines.
These bits are generally up-cutting to aid in removing chips. They often come with a coating that is intended to extend edge life or keep cutting temps low.
I was recently asked to create a pair of commemorative plaques. Essentially something like a diploma or other certificate, except these were to be carved into wood. No problem, right? I had carved plenty of signs before.
Well, the difference here was the scale of the lettering and the detail of the carving. I decided it was time to step up to some proper engraving bits.
I had been using standard v-bits for all of my sign making up to this point with no complaints. Here’s the problem, when you are carving at very shallow depths, like say 1/32 deep, the tip of a standard v-bit does a pretty bad job. The closer you get to the tip, the less cutting you are able to do because the bit is nearly stationary. Think about spinning a thumbtack on it’s tip. The flutes on the bit are so close together and shallow that you end up denting the wood instead of cutting it.
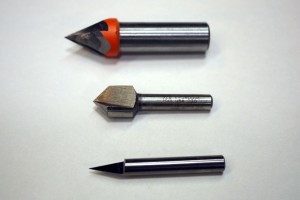
Here’s where engraving bits come into play. The tip of an engraving bit is not directly in the center of the bit. It is offset by a specific amount depending on the bit you buy. This offset allows the bit to do a much better job cutting at shallow depths. The result is more legible lettering and better detail on very small details.
There are several different angles, offsets, and tip geometries you can choose from. I picked up a set so I could try a few different configurations.
Try out the Amana Tools In-Groove bits. They allow you to replace dull blades on a single shank saving you lots of money.
When we think of CNC routers and their capabilities we often go right to the feats of complexity and precision. Impossible inlays, hundreds of exact copies of parts, complex shaping and carving, and perfect joints but not everything you use your bot for needs to be so complicated.
Flattening table tops is by far my favorite “alternate” use for my bot. I make a lot of tables and I used to haul the tabletops to a shop to have them flattened on a 4ft belt sander. They would turn out beautifully flat and smooth. On the other hand it would take time to make the trip and the shop would have at least a 2 day turnaround. There is also the risk of damaging that gorgeous glue-up in transit.
I decided to try to keep the work in my shop so I picked up a nice 2.5″ flycutter and laid a rough sawn board on the table. After a little tweaking to make the z axis perfectly perpendicular to the table, I was very happy with the results. I’ve done several tables this way. I’ve even experimented with ball-nose bits with large radius ends to create a scalloped finish.
One tip to keep in mind is to pay attention to grain direction and bit rotation. Set your stepover to a small percentage like 10% and be sure you are following the grain of the wood with your cuts. With a 10% stopover you can get very close to cutting only along the grain. Larger stopover settings will result in more cross grain cutting. This will leave swirls in your material and require you to spend a lot more time sanding.
You can accomplish this same thing with smaller bits as well. Give it shot and let me know if you have other “alternate” uses for your ShopBot.
After you’ve been using a CNC router for a while, you begin to look for ways to make your life even easier (as if having a robot do work for you wasn’t making it easy enough). For me, sanding is a necessary evil. Plywood is especially prone to fuzzy edges and chipped veneer both making your job take longer. After the CNC has done it’s work you are left with lots and lots of sanding to get those edges looking nice.
Here are a few tips to cut down on that pesky cleanup time.
First off, make sure your bits are sharp. Your bits can churn through hundreds of feet of cutting in no time and you shouldn’t be surprised at how quickly they dull. Nothing compromises your edge quality and sharpness of cut like a dull bit. As soon as you see your cuts getting fuzzy, it’s time for a sharp bit.
Secondly, consider whether you are performing a conventional or climb cut. I have found climb cuts perform better in plywood than conventional cuts. To see for yourself, compare your parts to the waste material. If the waste material has a cleaner edge than your part does, you should switch the direction you are moving from conventional to climb or vice versa.
Finally, consider the bit you are using. I have fallen in love with compression spirals like the Amana 1/4″ and 3/8″ bits from Toolstoday.com. Upcut bits are great for clearing chips and preserving the veneer on the bottom of your sheet goods. Downcut spirals are great for a clean top edge. Want a clean edge on both top and bottom? You’ll need a compression spiral.
These bits combine the benefits of an up and downcut bit in one. The end of the bit (B1) is shaped to pull chips up and the rest of the bit cuts down. The result is a bit that doesn’t chip the veneer on either face of your plywood or laminated sheet goods.
I’ve been using these Amana bits for a few months now and I love them. They have become my goto bit. While they may be a bit more expensive than your standard single direction bit, the time saved in sanding and cleaning up ragged edges more than makes up for it.
CNC routers need bits. They determine the kind of carving you can do, the resolution of your finished designs, and how fast you can move through the material. They come with cutting edges that pull up or push down (sometimes both), they have square or shaped ends, they are made for speed or accuracy, and they come in diameters from a pinpoint to over two inches for standard CNC routing.
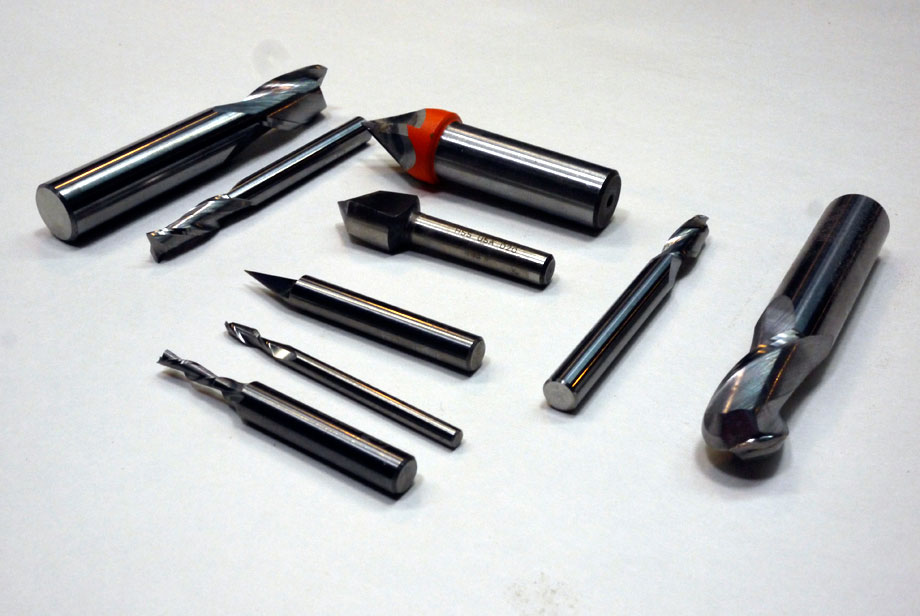
A basic collection of CNC router bits
Choosing bits to use for your CNC router can be confusing. There are a lot of variables to consider when looking for the best bit for you and your project. Here are a few key features to consider.
Choose the bit shape suited for your project
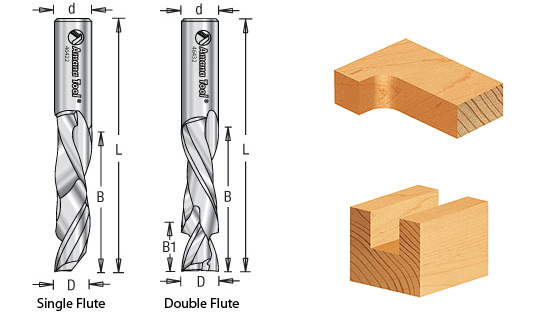
Are you making straight cuts in plywood? Get yourself a good quality spiral cutting endmill. End mills come in many different diameters. You can choose an upcut or downcut.
1/4″ and 1/2″ 2-flute upcut square endmills
Are you carving large 3D contours or carvings ? You’ll want a ball nose bit that is appropriately sized for the level of detail in your model. Ballnose (aka contouring) bits are fantastic for 3d carving (think topographical maps and the grape relief on the sign at the wine shop). You can carve with just the tip to get great detail and smooth contours or they can move a lot of material just like an end mill. I used a 1/2″ ballnose bit to carve a wooden sink.
For intricate 3d carving, consider a tapered ball nose bit like these. The slight angle of the cutting edge helps reduce the appearance of tool marks parallel to your material surface.
1/4″ and 1/2″ 2-flute ballnose endmills
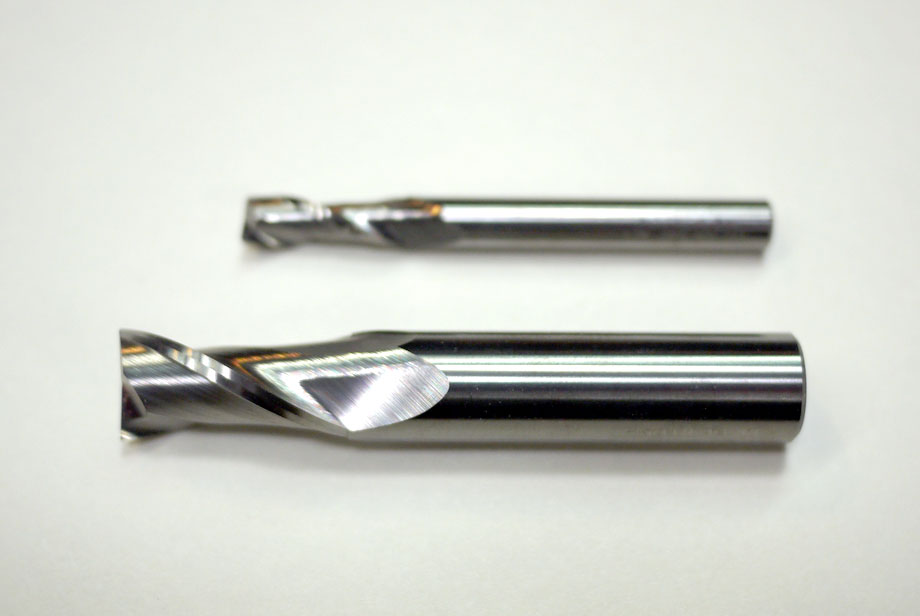
If you want to do lettering or detailed sign making, you’ll need to get a v bit. These are sometimes called v-carving bits, v-groove bits, or engraving bits. This is the only way to get a sharp grooved bottom on the inside of those roman numerals for your sundial. They are available in many sizes and angles. The most common and useful angles in order are 60deg, 90deg, and 30deg.
1/2″ 60deg, 1/4″ 45deg, and 1/4″ 30deg v bits
If you are flattening large boards or you are responsible for maintaining the spoil board on your CNC router, you’ll want to have a spoil board cutter or flycutter bit. These bits are made to skim the surface and leave a smooth flat finish. I recently upgraded to a 2 1/2″ bit and I love it. Its got four cutting edges and its what as known as an “insert” bit meaning the blades can be removed to be resharpened or replaced. It’s a bit of an investment but it is worth every penny. I love to use it to flatten tabletops.
Many manufacturers make bits especial for your material of choice. Bits for hardwood are designed to leave a clean edge. Bits for plywood and laminates are designed so they won’t mangle the outer veneer layers. Bits for hdpe sheets and other types of plastics are designed to avoid excessive melting. Aluminum cutting bits are designed to clear chips efficiently to avoid rewelding (heated chips getting fused to the hot cutting tool). Many bits can be used for multiple applications so you don’t need to buy 30 bits right away if you are in the prototyping stage of your project. A good all purpose bit is a 2-flute up cutting spiral bit.
Use the strongest bit you can
One important thing to remember when choosing a bit is that short, stout bits will produce cleaner cuts. Having excessively long bits invites tool vibration and deflection (bending) of your bit. Both of these conditions make for rough looking cuts and greatly shortened tool life. For my own work, I tend to use 3/8″ and 1/2″ shank bits. Not only do they resist deflection and vibration better than 1/4″ bits but they cut much more quietly. 1/4″ bits tend to ring and scream as they cut. You will notice a huge decrease in that deafening noise as you use larger diameter bits.
Balance your need for speed with edge finish
Generally speaking, the bit design you choose will be designed to cut fast or cut smooth. Think of the difference between a chainsaw (fast) and a hand saw with fine teeth like a fret saw (smooth). If you need to cut a large amount of material in a hurry in a high volume production environment you’ll go for an aggressive bit that can be pushed through your material quickly. If you are making furniture and you’d rather not spend a day sanding a ton of tool marks off your nice hardwood, you’ll want to choose a bout that is made to leave a smooth finish. The more flutes (cutting edges) that a bit has, the finer the cut. A single flute bit will be very aggressive and leave a rougher edge than a 4 flute bit will. On the other hand, you can push a single flute bit through your material much faster than a 4 flute bit. This is because making one cut per rotation allows for a more aggressive feed speed than a bit that makes 2, 3, or 4 cuts. Chip clearance is also improved with fewer flutes meaning faster cuts.
Choose the appropriate bit direction
Spiral bits are a great multipurpose tool for lots of applications. I used 2-flute spiral bits for all of my work for at least the first year I used my ShopBot. They offer a good balance of cut speed and edge finish and can cut a variety of materials from wood and foam to plastics and even aluminum. The biggest decision you’ll need to make when picking your bit is cut direction. Your choice are uncut, downcut, and compression (a combination of upcut and downcut).
Upcutting bits mounted in a CNC pull chips (and your material) up and away from the table. They are great at clearing out chips from your cuts to avoid overheating your bits. They excel at making cuts all the way through material since they just slightly lift the material and scraps up into the end of the bit. Because of the upcutting action, these bits have a tendency to splinter the top surface of sheet goods like plywood and melamine coated particle board. You also need to be very sure that your material is securely held down to the table so the bit doesn’t lift it from the table and chuck it across the room.
Downcutting bits press chips and material back into the cut and into the table. The downshearing action of these bits do a fantastic job of preserving your material’s top surface. Since the chips are forced down into the cut, these bits should never be used to drill holes. The friction of the bit against the compressed chips is enough to melt plastics and start wood on fire. Downcutting bits are preferred for cutting flexible thin material like 1/16″ aluminum sheet since they keep your goods flat to the table where up cutting bits may tend to pull the material up off the table. These bits are not the best at through cuts since the bottom layer of your material is pushed away from the bit by chips and the angle of the spirals leaving a small amount of material or “onion skin”.
A third option called a compression or up-down bit offers some of the benefits of both up and downcut bits. The bit is a standard downcut bit until you get to the tip. The direction of the cut is switched making the tip an upcutter. This means that you can cut through materials like plywood and you will get a clean edge on both sides. The top is shear down, the bottom is pulled up. Compression bits are never to be used to drill holes. Once the bit has been plunged beyond the direction change, the chips have no way to escape and get compressed creating an extreme amount of friction and heat. Compression bits are a little more expensive because of the complicated manufacturing of the cutting edge but they are my goto bit for nearly all of my wood cutting.
Setting feeds and speeds
When people talk about “feeds and speeds” they are referring to two specific settings. Feedrate (feeds) refer to how fast the machine moves laterally through your material. This is generally measured in feet/minute or inches/second. When you hear someone talking about “speeds” they are referring to the spindle/router RPM. Manufacturers will provide a recommended “feeds and speeds” for their bits. Some manufacturers prefer to present a target “chipload”. Chipload refers to the physical size of the chips the bit creates when making a cut. Higher feeedrates produce larger chips. Higher tool rpm produces smaller chips. If your chips are to large, you risk breaking your bit. If your chips are more like a fine powder, you are probably dulling your bit. IT’s a balancing act but start with the manufacturers recommended settings and adjust from there.
Chipload = Feedrate / [RPM x number of flutes]
Sharp bits and Resharpening
Sharp bits are critical to making good looking cuts. Sharp bits are nice and quiet compared to the slapping sound of a severely dull bit. Dull bits are loud and messy. Recognizing a dull bit will get easier as you do more cuts and get your eyes and ears tuned to your machine. You can put a few hundred feet of cut time on a bit in a hurry on a CNC router. Combine that with feeds and speeds that aren’t tuned properly and that shiny new bit is toast after one job. Many manufacturers and local shops offer sharpening service for router bits. Be sure to check on the prices before you commit to have all of your bits sharpened though. Many times it’s cheaper to buy a new bit than have it sharpened. Sharpened bits can also have a slightly smaller diameter than a fresh bit. Ask the tech if your bit diameter will change after sharpening. Do not attempt to sharpen CNC bits by hand. The high speeds and forces on bits in a CNC router put great stress on the bits and hand sharpening can leave your bit misshapen and prone to a dangerous break.
Storing your bits
You’ll want to protect your investment in bits. Be sure the edges of your bits aren’t allowed to bang into each other causing nicks. Carbide can be brittle, especially when knocked against another piece of carbide. A great first project is a bit holder. Design your own to meet your needs. If you travel to and from a makerspace, make something with a closing lid so you can throw it in your bag.
Specialty bits
There are hundreds of other profiles for all kinds of special applications. Once you start production on your kickstarter project you may want to investigate more of your options. There are bits to help make dovetails, bits for etching glass, bits made specifically for drilling holes, and many other applications. Confused? Here are some suggestions to get you started.
I was recently asked to build a tiki head statue for a local restaurant. The lure of rum soaked drinks made the job hard to turn down. I figured my recently acquired CNC router made the task possible for me since I have no formal sculpture training. As with most everything, it seemed simple before I realized what I was getting into. The project was a fantastic teacher and I am much more comfortable with the basics of CNC router operation as a result.
The Plan
Review design options with the client
Download and modify the model
Slice the 3D model into layers
Carve the layers
Reassemble the layers
Complete final shaping and finish
I started my search for a model at the sketchup 3Dwarehouse. Not finding what I wanted there, I found some great 3d models at turbosquid.com and brought the screenshots to my clients. They picked the one they liked.
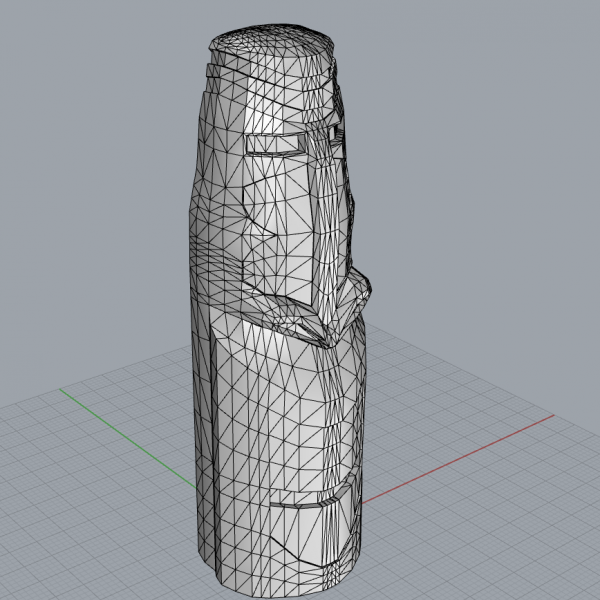
I downloaded the file. I would need to do a little 3D editing (I use Rhinoceros) to make the shape machinable. I made the eyes and area between the teeth less deep and I modified a few other contours to make machining easier.
Editing the 3D mesh in Rhino
I then set off to figure out how the heck I would build the thing.
What material would I use?
The plan called for a 4′ tall, 18″ diameter statue. I had considered using polystyrene foam. It’s light and easy to cut on a CNC router. It’s fairly inexpensive. I figured I would then paint and coat the finished foam to make it look like weathered wood. This plan seemed solid until I realized I don’t possess the skill to faux paint foam to mimic wood.
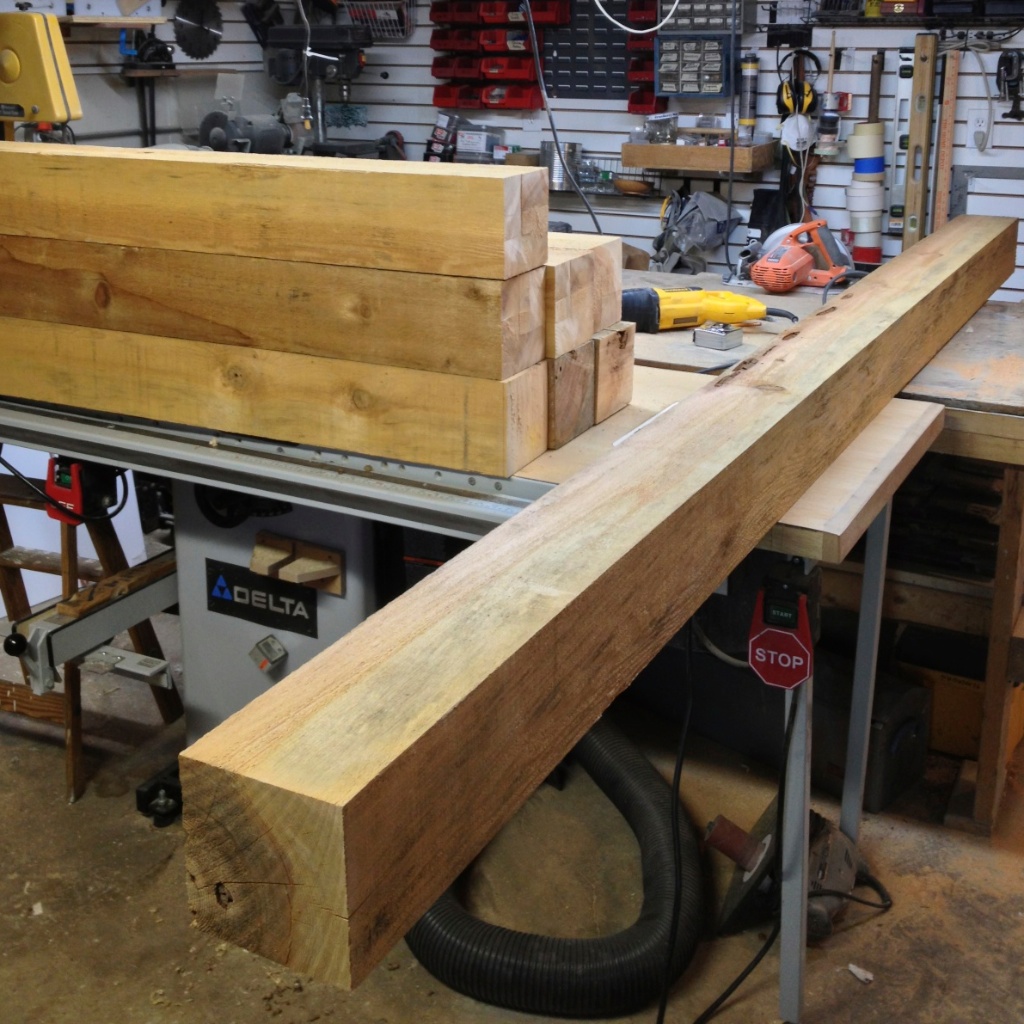
I then decided I would construct this thing out of actual wood. I am a woodworker, after all, so I know what it takes to fix the inevitable mistake. I checked out the local lumber yard and found a great deal on some 10’x6″x6″ cedar timbers. Since the original plan was to place this on a patio, cedar was a great choice. It is naturally weather, rot, and insect resistant.
10′ cedar planks to be milled and glued up
I brought the planks home and began breaking them down so I could glue up three 4′ x 18″ x 6″ slabs.
Next I had some work to do to create the toolpaths. I use Aspire to do my toolpathing and much of my design work. It’s fantastic to be able to edit your design and tool paths without having to jump between software. I imported the STL file into Aspire and set the model size. I used its slicing feature to create 3 separate 6″ thick slices. To accomplish this, I first positioned my model so that it was laying face up on the table plane. Then I was able to run the slicing command. The software prompted me for my material thickness. I accepted the settings and 3 separate model files were created. Now I could open each of these and design my tool paths appropriately for each. The first layer would be machined from the front. The second (middle) layer would be machined from both sides. The back would be machined from the back. Aspire allows for 1, 2, and 4 sided machining. I used 2 sided machining for the center slice and 1 sided for the front and back.
Time to start cutting
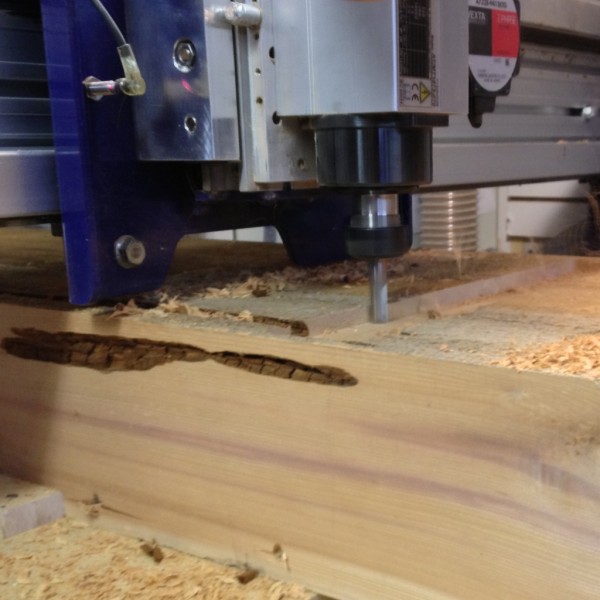
I have a ShopBot Buddy (which I love) and at the time it was outfitted with a 4′ x 4′ table. This was just big enough in length and width. The main obstacle I needed to work around was the Z travel, or in other words, the maximum amount the machine will move up and down. The machine in it’s current setup allows for a max of 8″ of travel and has just over 6″ of room under the bracket that holds the router. I had planned to use 6″ thick slabs which meant I could use 2″ long bits. This didn’t seem like a problem to me at the time but I in hind site this was a decision that made things much more complicated.
You can see how little clearance I had below the blue brackets.
Here’s how to figure out your maximum depth of cut.
Take your total Z travel (from the uppermost limit until the collet hits the table). In my case this is 8″. Divide that in half and you get 4″. This is both the thickest piece of stock you can cut as well as the longest bit you can use while still being able to move the bit up and over your stock without cutting it.
Like I said, I was committed to using 6″ thick stock (and subsequently a 2″ bit). This meant that I needed to pay extremely close attention to the machine and anticipate where the collet might bottom out either on waste or the carved model itself. Some CAM software allows you to model your CNC machine so that you can verify if there will be any collisions ahead of time. This was a major time-sink since I had to babysit the machine much of the time, pausing the file occasionally while I hacked away at waste or other high spots. LESSON LEARNED! Next time I will use 4″ stock and 4″ bits.
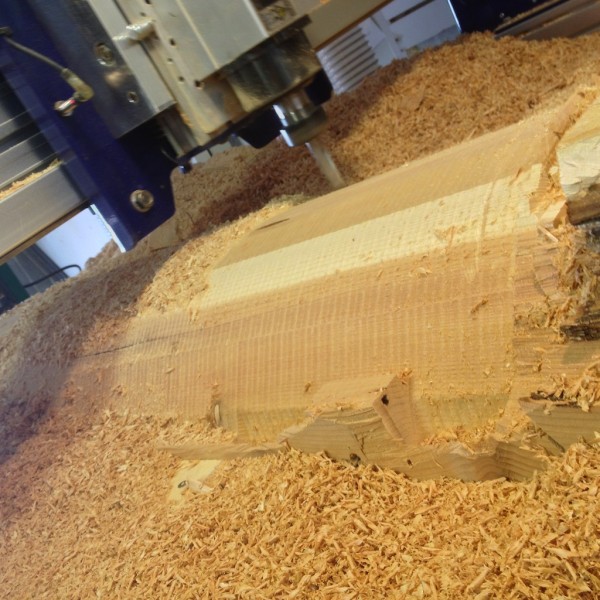
I started with the roughing pass using a 1/2″ 2-fluted square endmill. I set the max depth of cut per pass to 1/2″ (a general rule of thumb is you should not cut deeper than the diameter of the bit per pass). I set the stopover to 90% (90% of the bit is cutting fresh material on each pass) to get the job done quickly. I started with a moderate feed rate of 2in/sec and a spindle RPM of 14,000.
Lots of cedar chips!
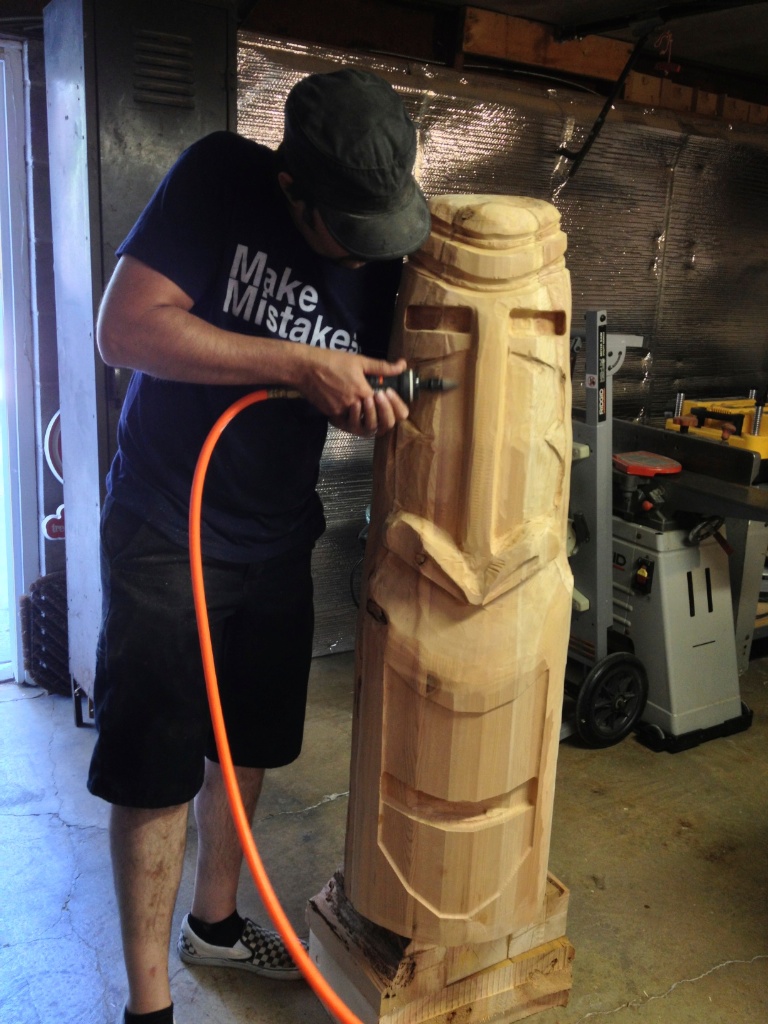
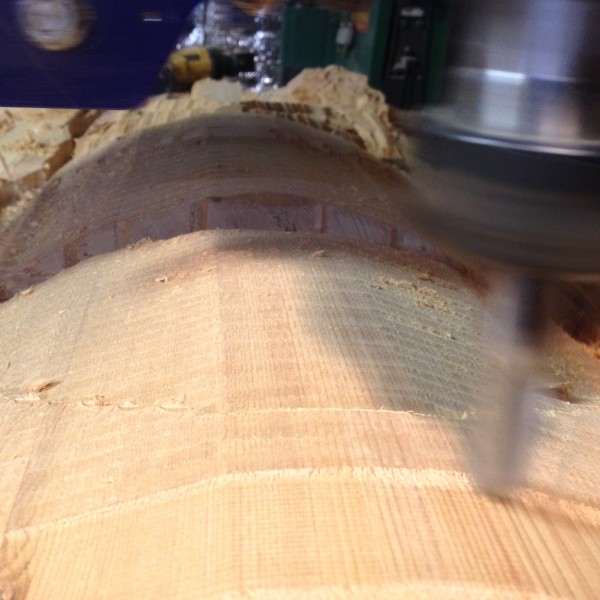
Once the roughing pass was finished I switched to a 1/2″2-fluted ballnose bit to complete the finishing toolpath. I set the stepover to 10% to give myself an easier time sanding. Again I started at a moderate 2in/sec feed rate with a RPM set to 14,000. I was able to use a slightly longer bit now that the roughing pass was complete and there was a bit more space between the top of the model and the spindle bracket (the blue blur in the upper left of the photo below). This allowed me to complete the finishing pass with a minimal amount of babysitting. There were only a couple of areas where I was concerned about the collet bottoming out.
Starting the finishing pass with a 1/2″ ballnose bit.Front third carving complete.
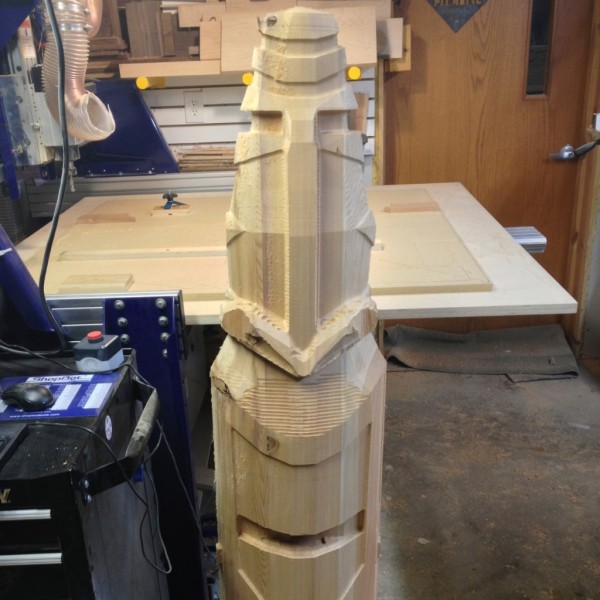
The process was precisely the same for the back third. The center portion was machined once from the front and once from the back. I used a fence that I attached to the table to register the middle section once I flipped it over. Because of the shape of the center section, there was a 2″ ridge of wood that could not be directly machined.
Once all three slabs were shaped it was time to assemble. This was a bit of a challenge and I needed to get creative with my clamping techniques. Two quarts of glue and a day later I was ready to take the clamps off and do some hand shaping.
Lots of handwork. I had a great time doing this.
I used a combination of hand scrapers, die grinders, and an angle grinder loaded with a sanding disc to remove the tool marks and add a few details to make it look more authentic.
Tiki glamour shot
I finally applied some waterproofing deck finish and some black and white accents to make his features really pop.
The client was thrilled and I love to pop in from time to time for rummy cocktails and a look at the finished product perched above the tiki bar.
Resting in his perch above the bar with a nice view of the local wildlife
Being a tinkerer, my wife often tries to surprise me with tools for gifts. She even wanted to give me a Thermal Dynamics a80 Plasma Cutter machine. Last Christmas she bought what has become my #1 favorite tool to use when working at the 4×8 CNC router.
This nifty Rockwell Sonicrafter multitool is great for lots of oddball jobs where other tools fail.
For CNC router cuts, I work without a vacuum table so almost all of my parts have tabs to hold them in place while the bot finishes my cuts. Armed with a small cut-off blade, this tool has found a permanent home plugged in next to the ShopBot where it is at the ready to cut through the tabs on all of my work. You can flush cut right up to your finished part without having to wrestle a sheet of sliced up plywood hanging off the end of your table.
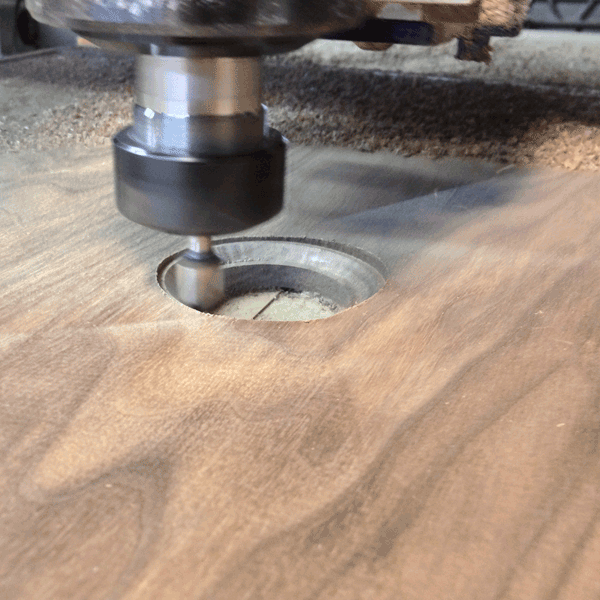
I had the opportunity to visit ShopBot headquarters a few months back. While chatting with their training master TJ, he bragged about his great big 2.5 inch fly cutter bit. I have to admit I was envious. My bit was half the size.
I finally had the opportunity to pick up a bit to rival his.
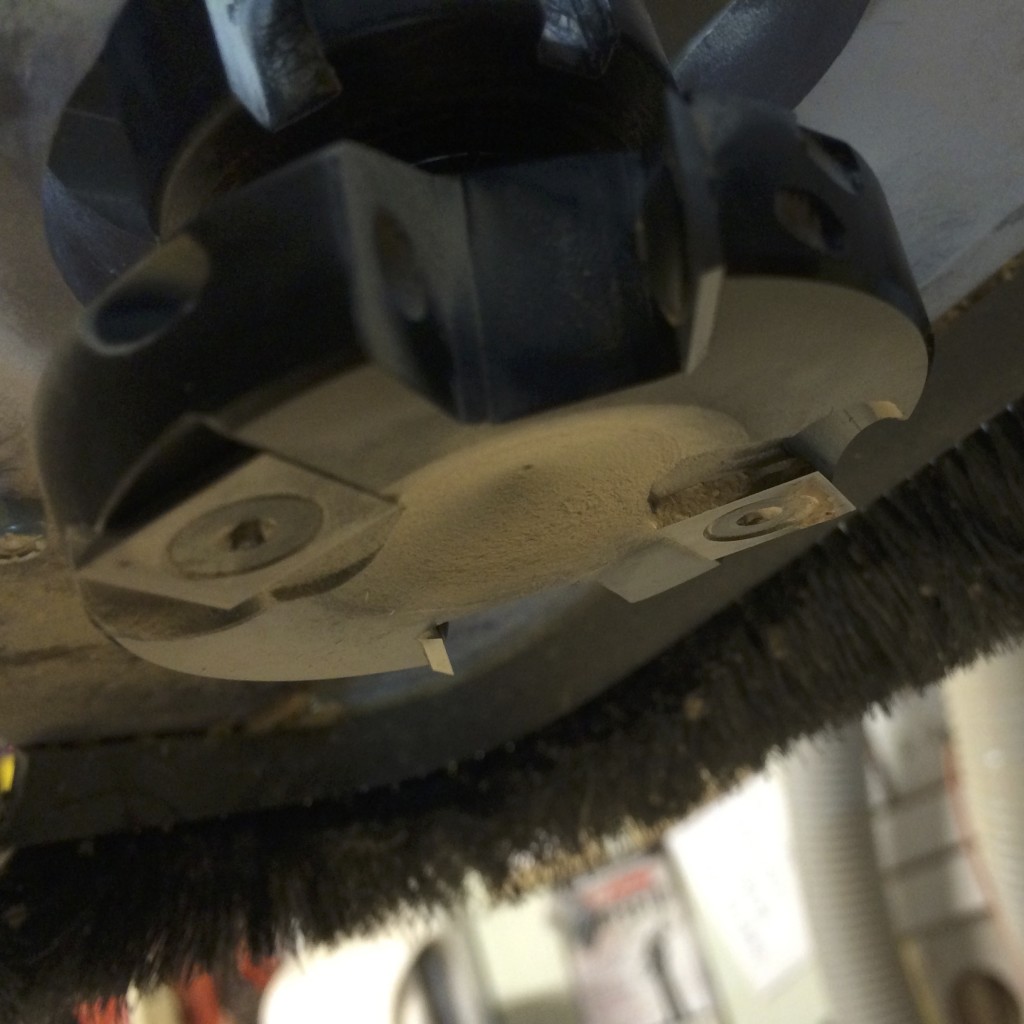
I got myself a 2.5 inch Amana Tools fly cutter. Tonight I had the first chance to put it to use on my severely gouged up spoil board.
First off, this is a hefty piece of tooling. It looks a bit intimidating and weighs at least a couple of pounds. It has 4 carbide inserts (2 to flatten and 2 used as scoring cutters) meant to carve a smoother surface than traditional 2 cutter styles. All of this is mounted on a 1/2 inch shaft. It is easily the largest bit in my drawer. This thing is a monster.
After I created my tool path and chucked it in, I spun it up for a trip across my table. The first thing I noticed was the sound of the bit cutting through the air. At 14,000 RPM the size of the bit moves a heck of a lot more air than the 1/2 inch cutters I use every day. The sound of the bit as it started cutting is equally as surprising. On my MDF spoilboard, I was reminded how quiet sharp high quality bits can be. I think the combination of scoring cutters and flattening cutters adds to the low dB levels.
The cut quality is pretty impressive as well. The surface is perfectly smooth with brand spanking fresh sharp cutters. Here’s the best part about these insert style bits. Each square carbide cutter insert can be rotated after you dull your edges. This means you get a fresh cutter 4 times before you have to think about replacing your edges. I love that! I wish all of my tools worked like that.
I can’t wait to use it to plane a hardwood tabletop. I’ve used a smaller flycutter bit to surface tables before. I get decent results but this giant will be sure to plane a surface that needs even less sanding.
I wish I hadn’t waited so long to follow TJ’s advice. This thing is great.
“What do you want? You, you want the moon?! Just say the word and I’ll throw a lasso around it and pull it down. I’ll give you the moon, Mary. Well then, you could swallow it, and it’d all dissolve, see? And the moon beams’d shoot out of your fingers and your toes and the ends of your hair. Am I talking too much?” – Jimmy Stuart – It’s a Wonderful Life
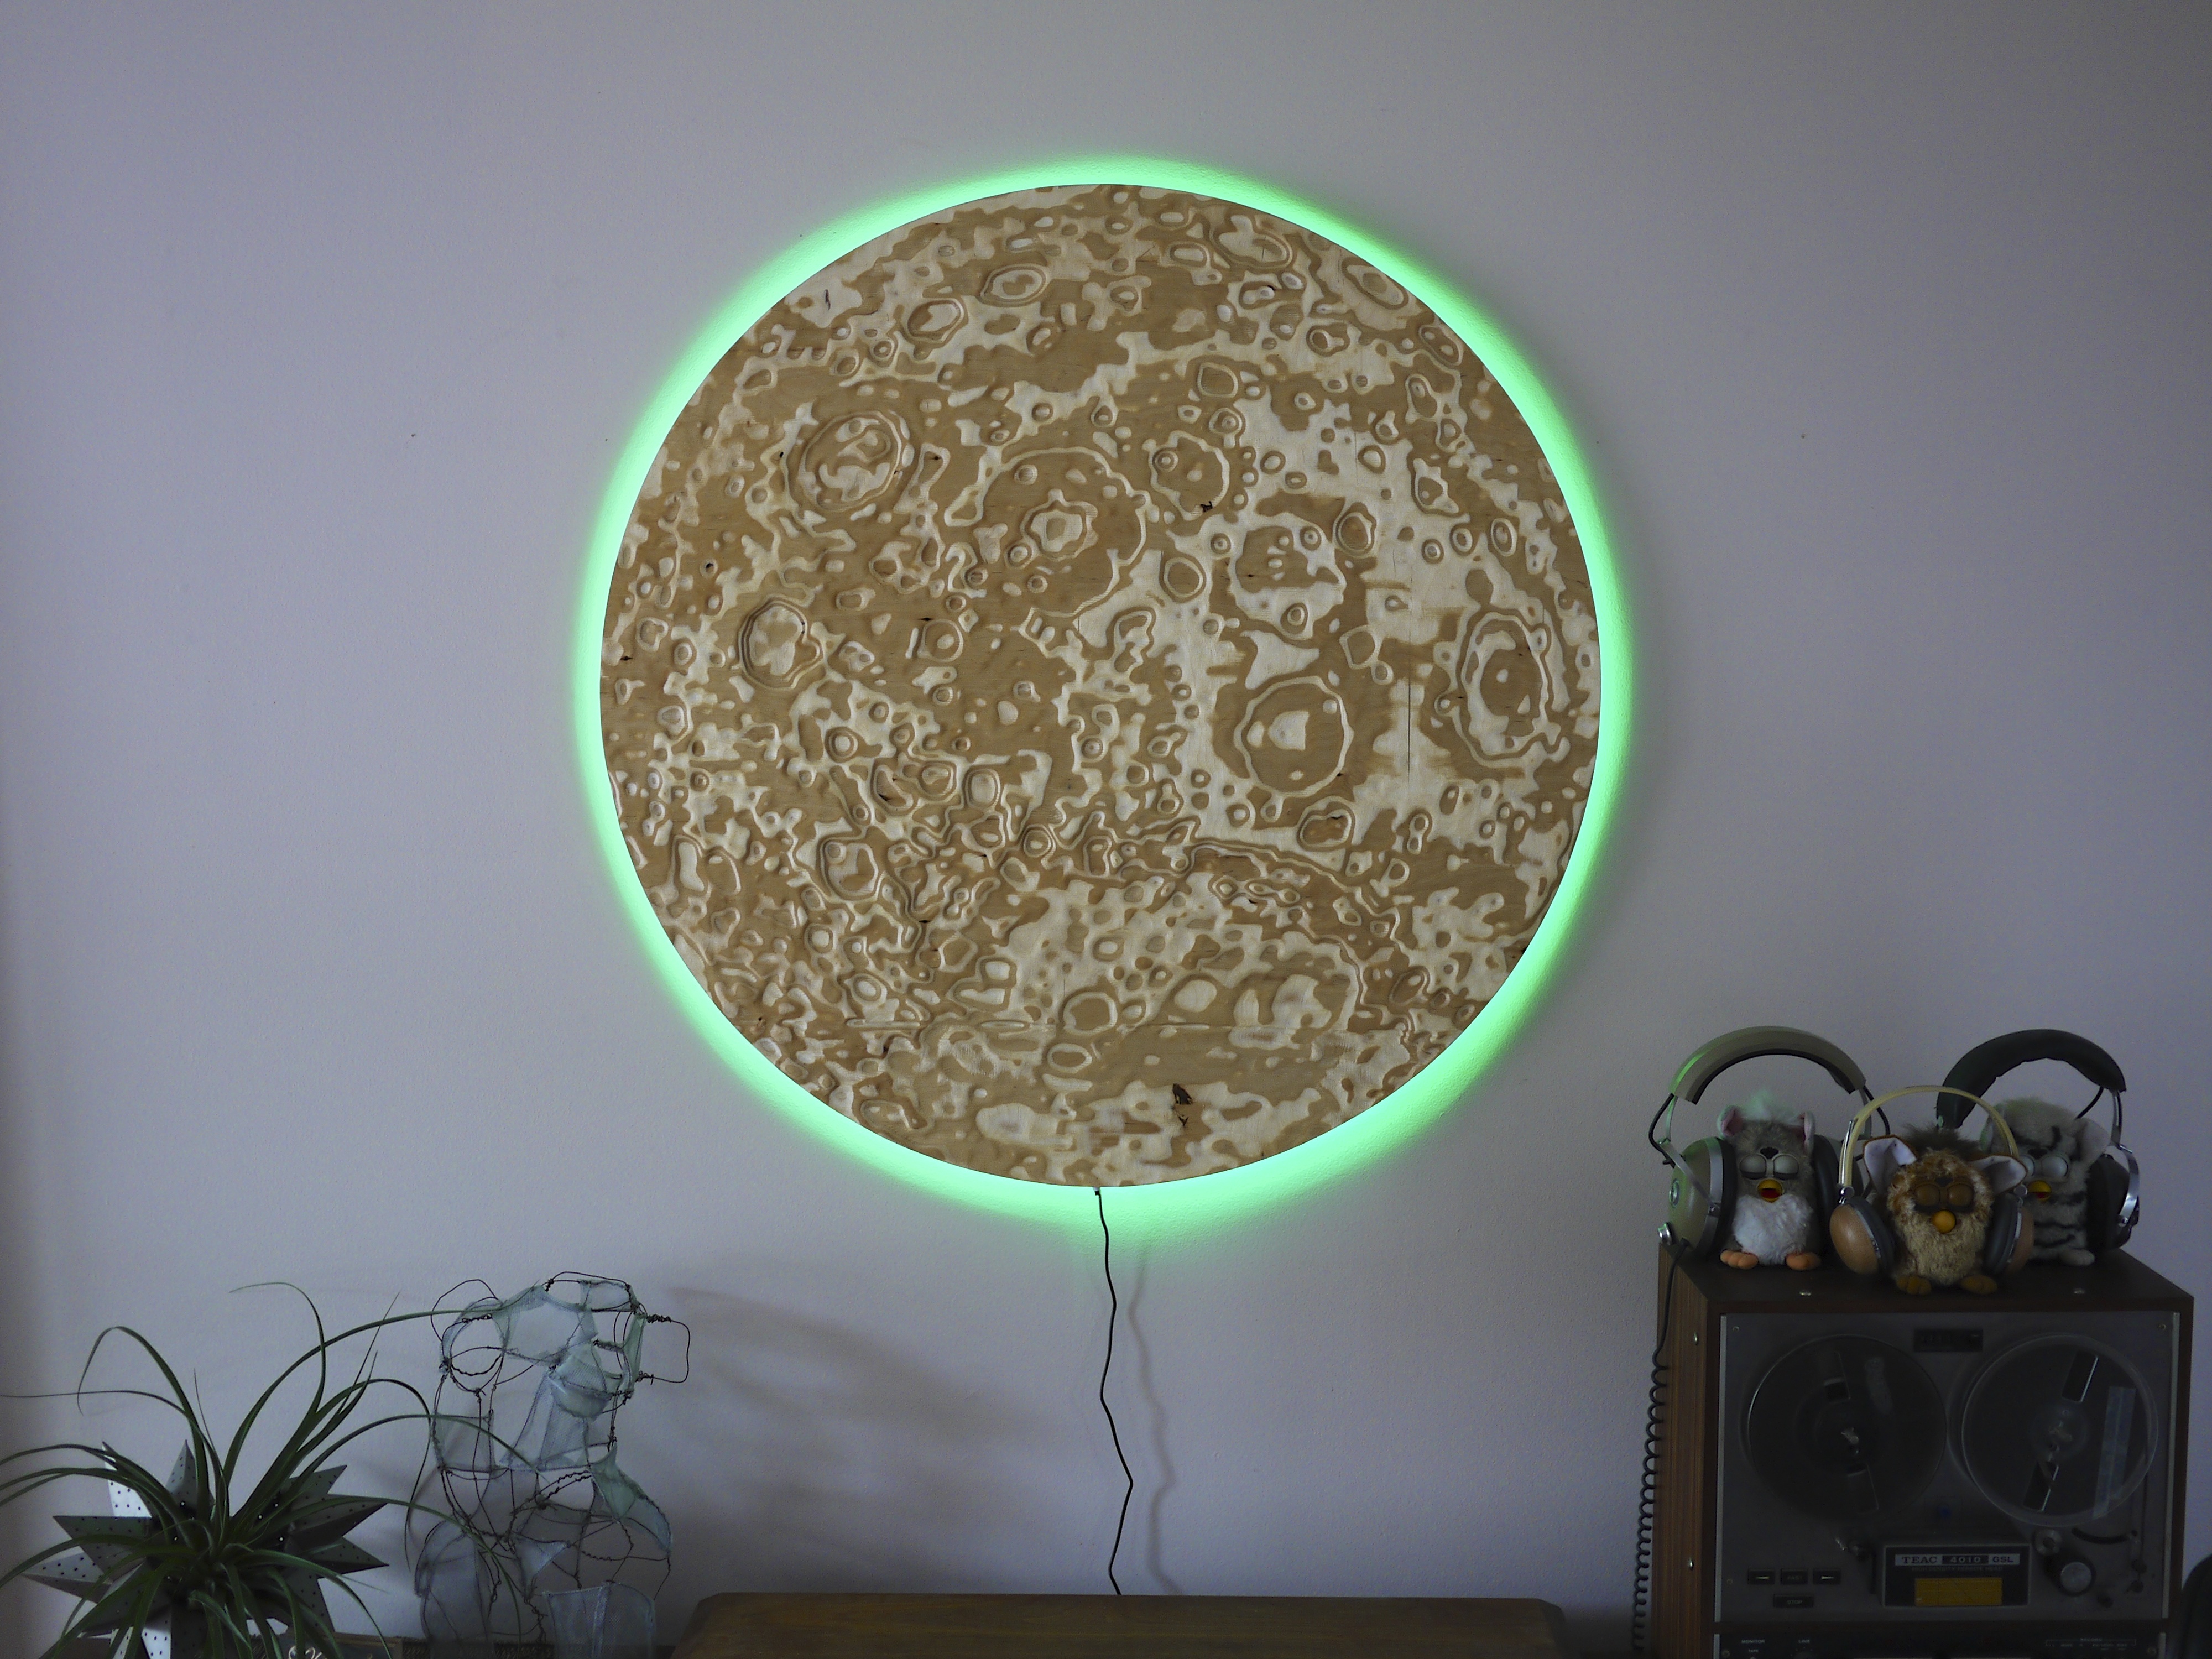
I’ve been married to my wonderful wife for 5 years. The traditional gift for the 5 year anniversary is wood. No pressure for a woodworker… Well, she made it easy on me, she asked for the moon.
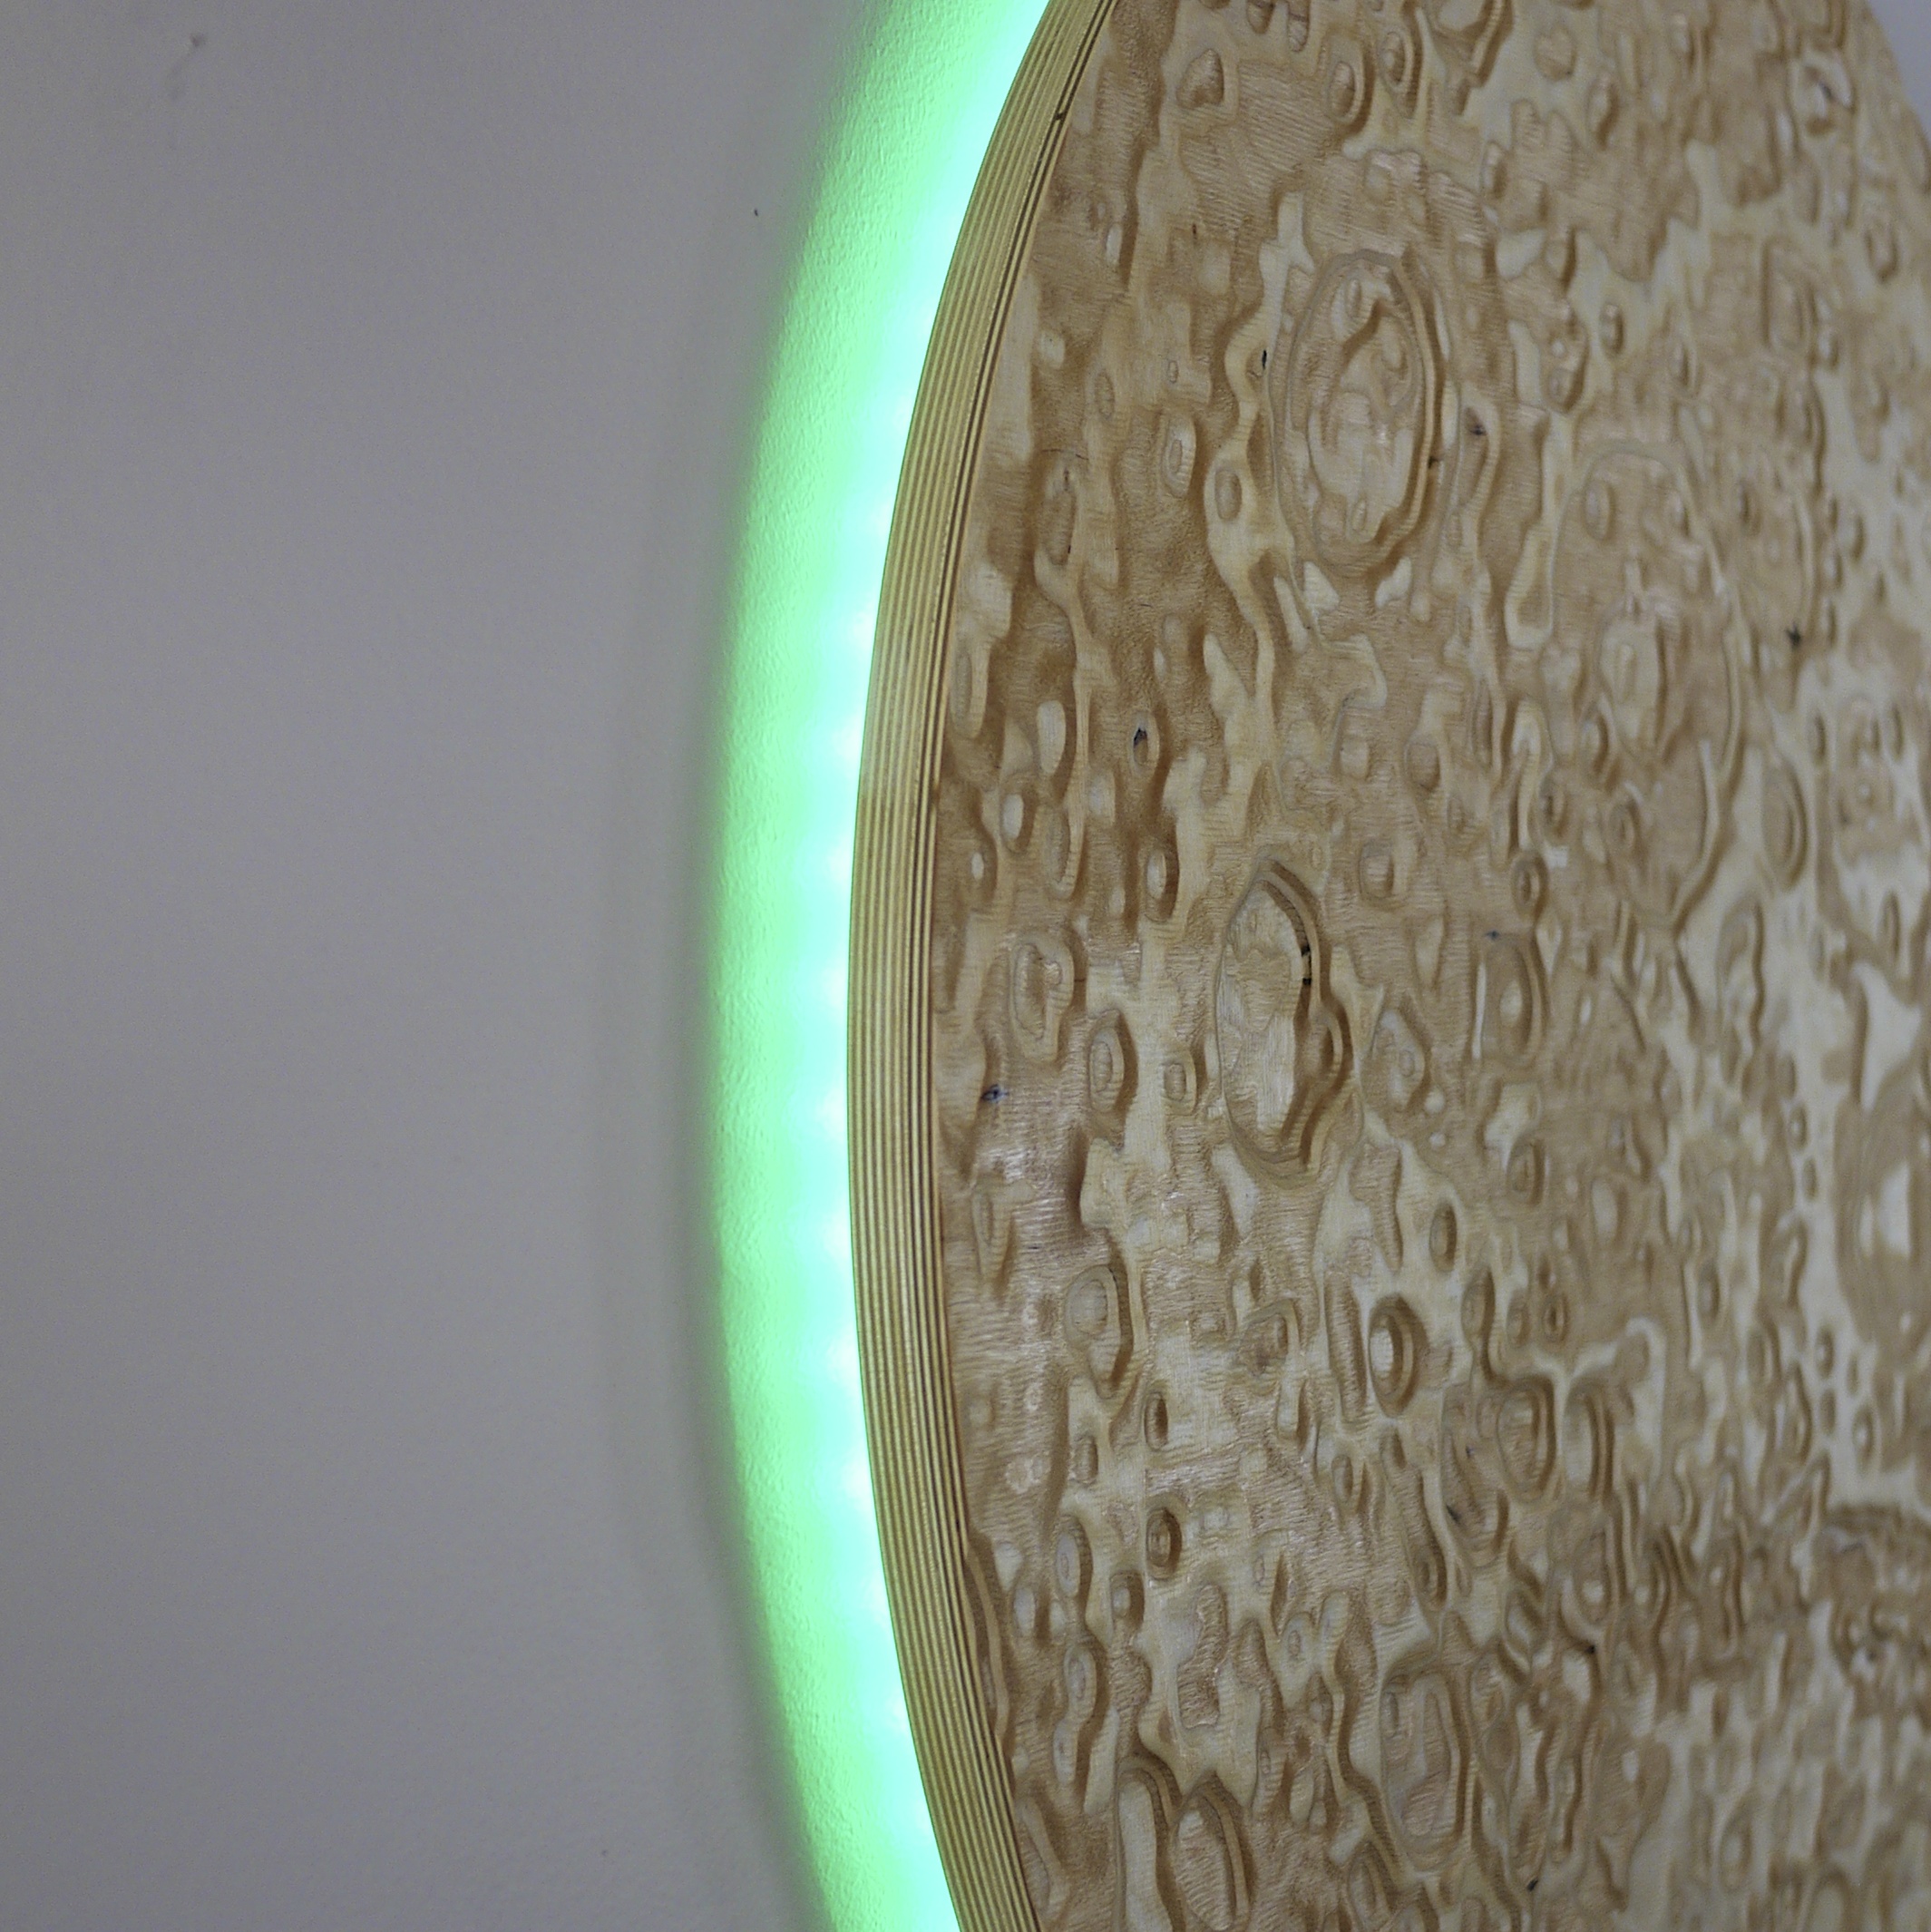
I started by consulting NASA’s website. I was in search of topographical data I could translate into toolpaths for the ShopBot. I was in luck when I found the GLD 100 map. I chose the far side of the moon since we otherwise don’t get to see it and I’ve been known to indulge in Pink Floyd.
From there my friend Ben Hribar helped me out with some photoshop work. We produced a grayscale image where lower elevations were black and the highest elevations were white. Once that was done, it was on to modeling.
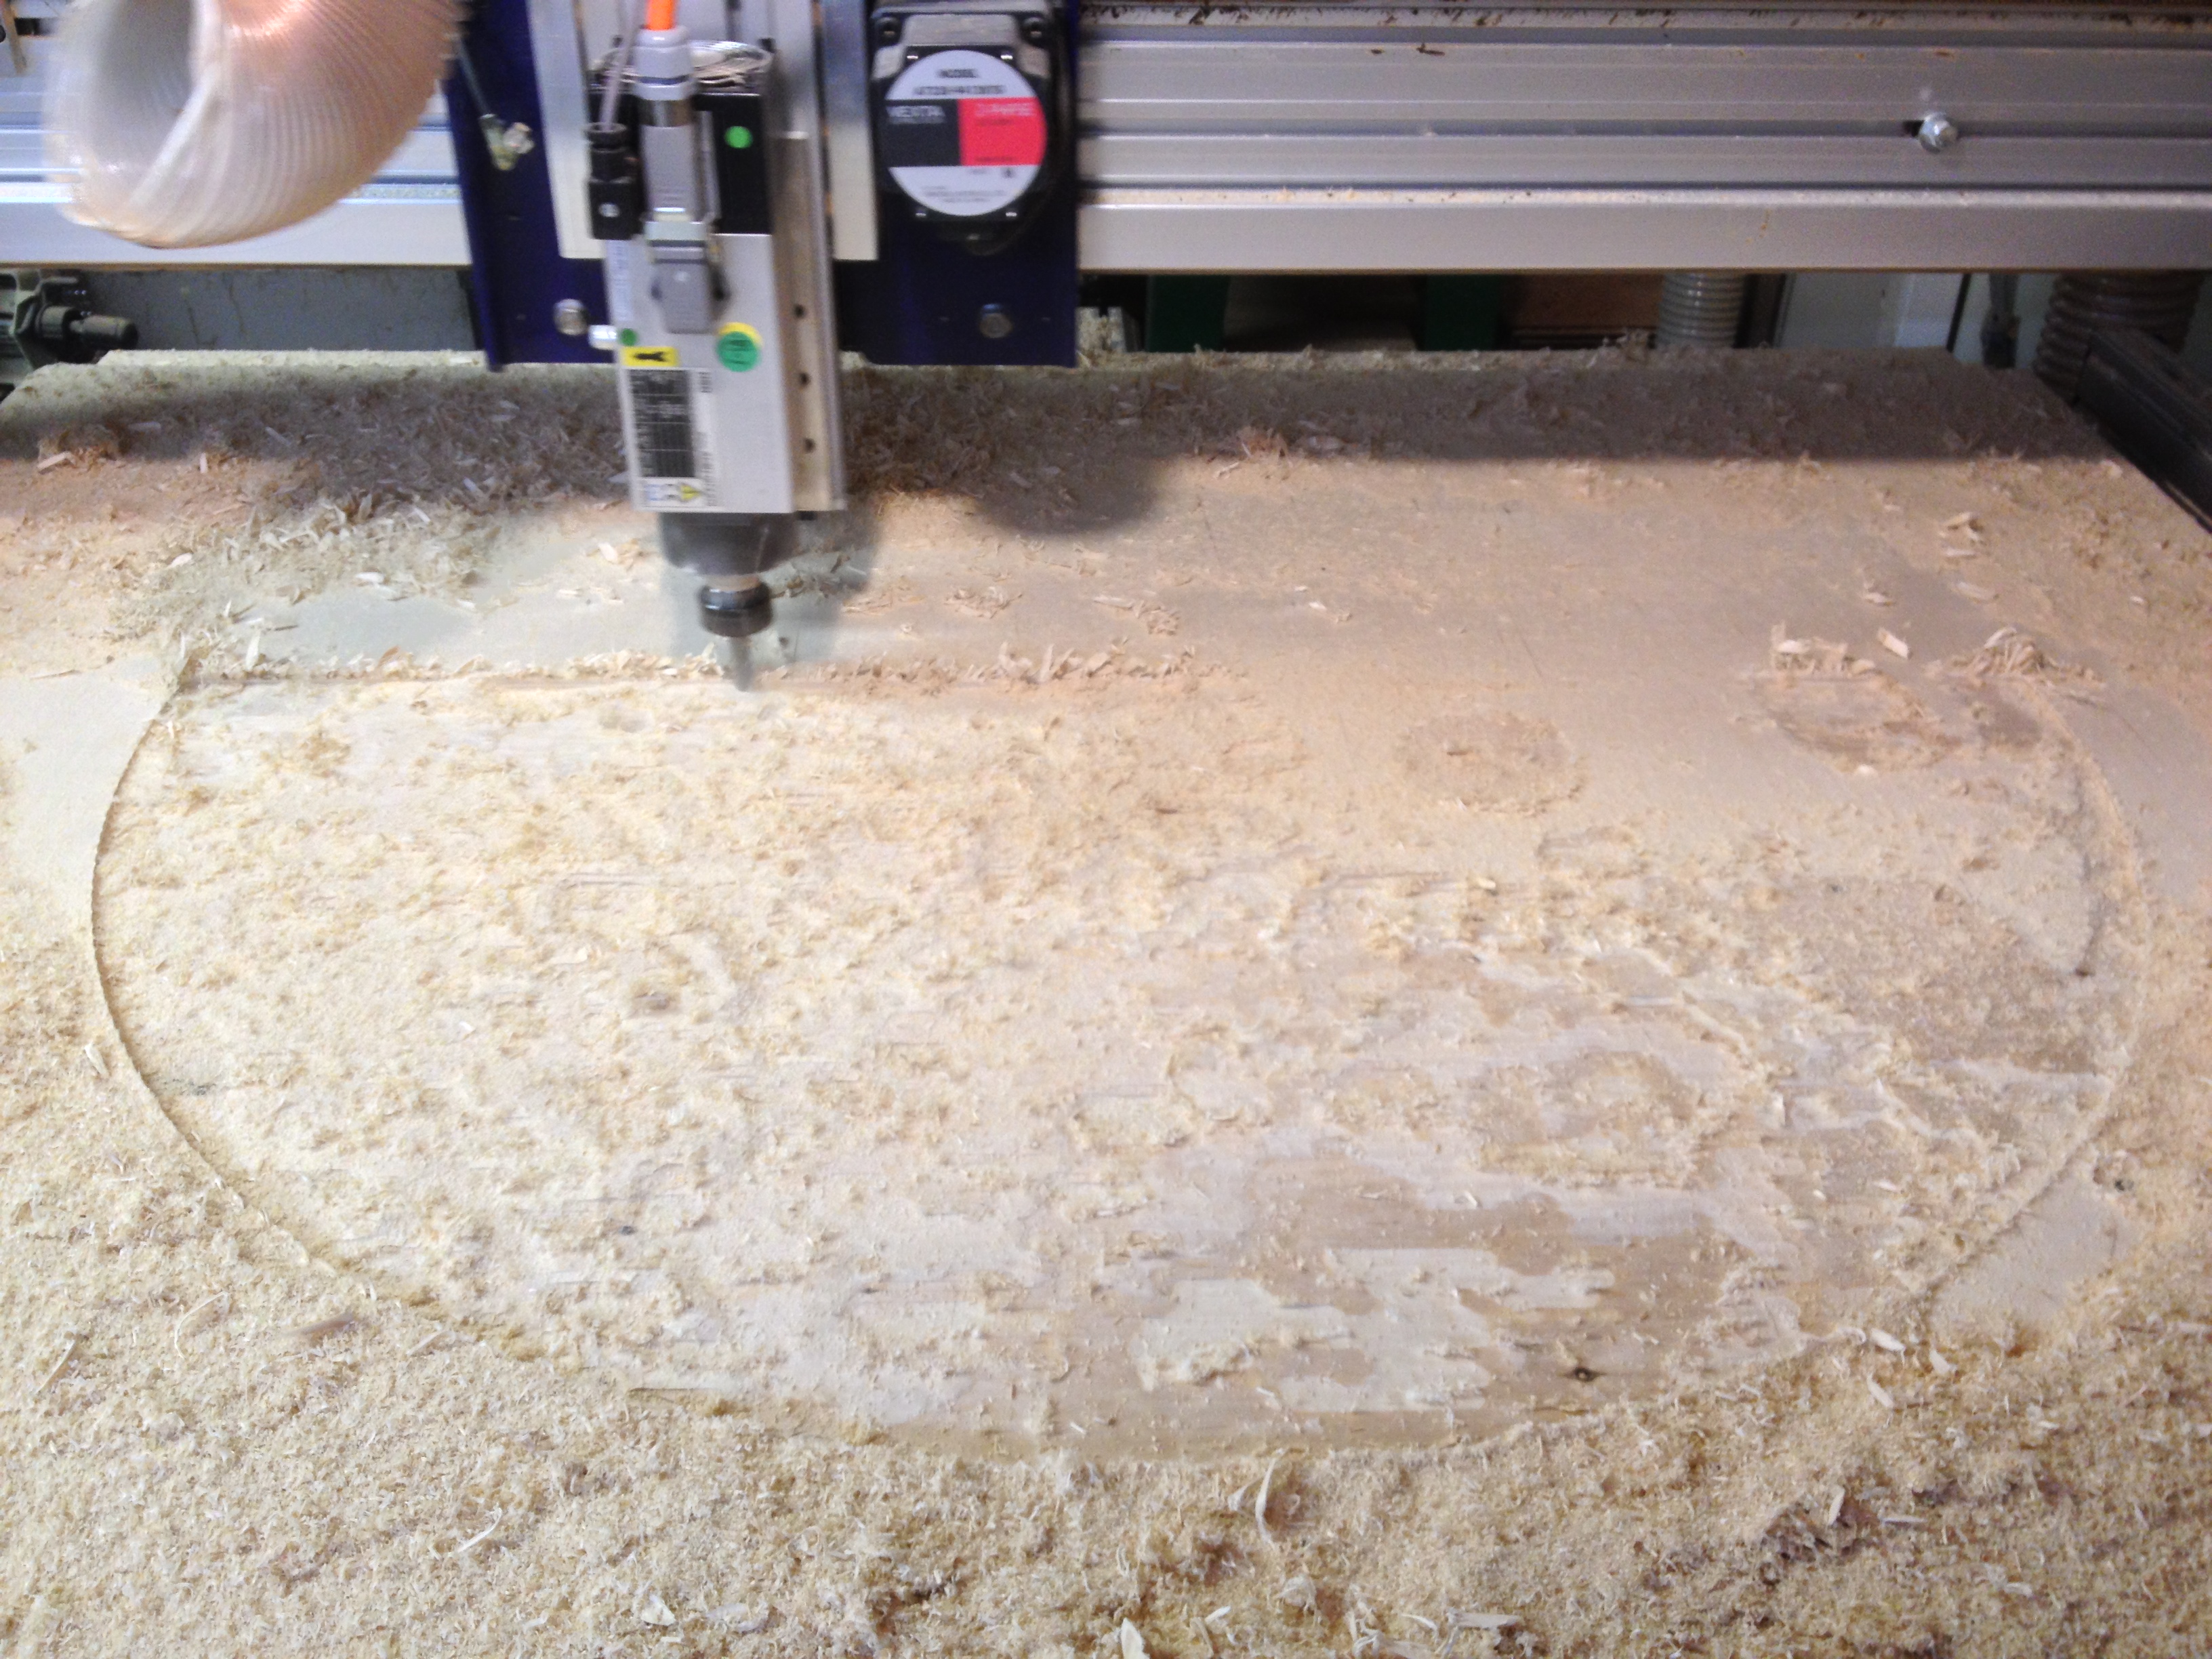
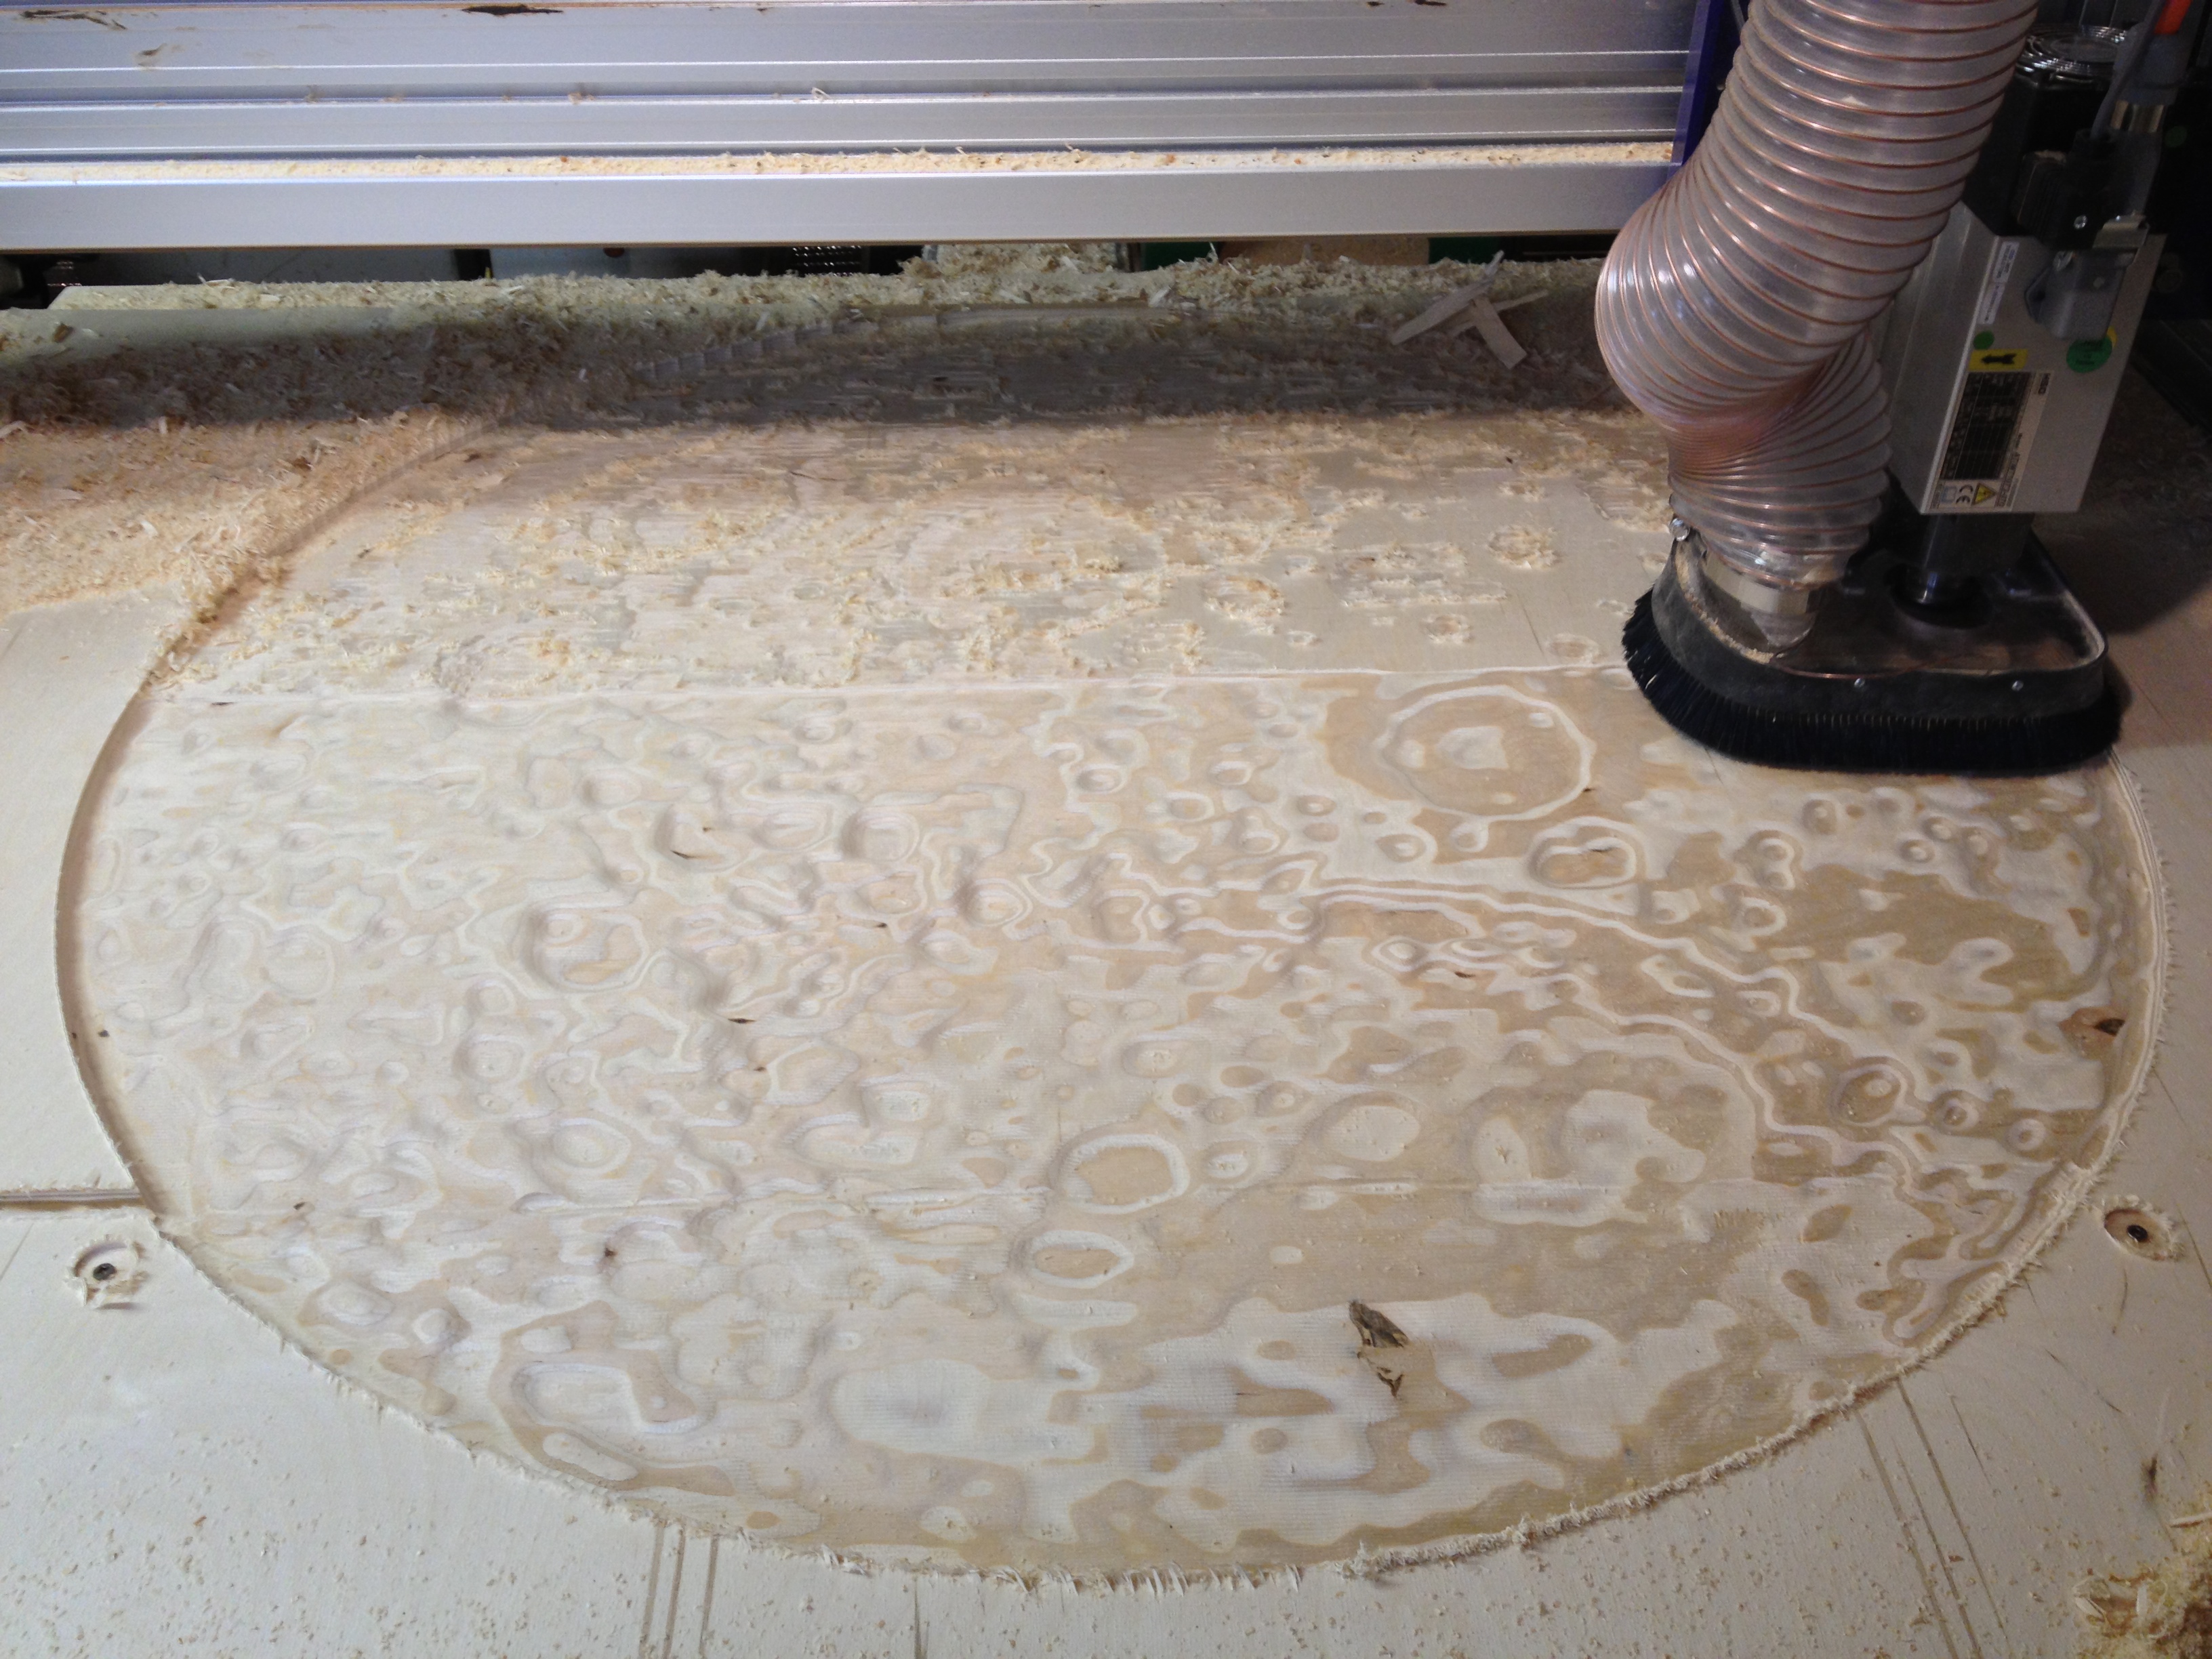
The software I use with the ShopBot has a tool that allows you to import a grayscale image, set a few parameters like material thickness, the range from lowest cut to highest cut, and a few others. Once the image was processed, I was left with a 3D model ready to carve.
I created a roughing toolpath to remove the bulk of the material with a 1/2″ square endmill.
Then I created a finishing toolpath to give a nice finish with a 1/2″ ballnose mill. See my post on router bits for more explanation of these.
The moon is carved from a single piece of 3/4″ baltic birch plywood. I love the way the alternating layers of dark and light veneers accentuate the topography.
I cut a second ring to mount on the back of the moon. It’s purpose is to provide a lip to hang the moon from, hold 4 – 3/8″ dowels to bring the moon away from the wall, and to accept a strip of LED lights.
I chose analog LEDs for the price and simplicity of setting them up. The set I bought came with 16′ of LED tape, a power supply, a controller, and a remote control.
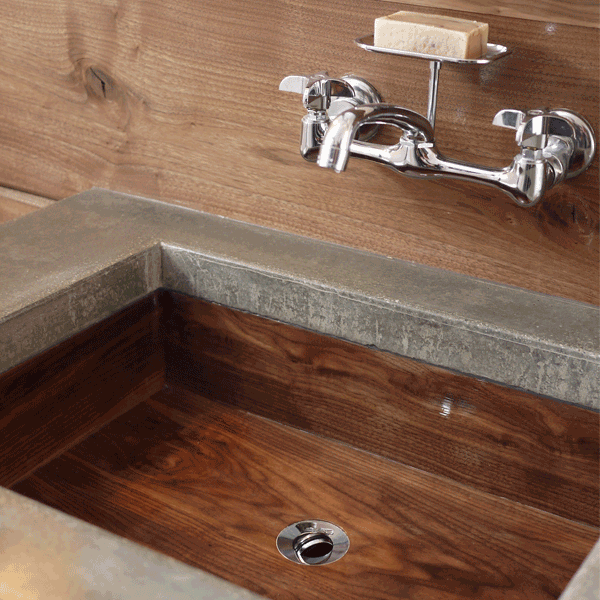
Marble, stainless, porcelain, and even pottery, we’ve all seen sinks made with basic materials but few of us have seen wooden sinks. Mike from America’s Woodshop in Bloomington created a turned wooden sink for the DIY Network’s “I Hate My Bath” and it got us thinking about our planned bathroom remodel. We knew we wanted to incorporate some wood into the design. Why not carry it through with a wooden sink?
The plan:
Concrete countertop
Undermount wooden sink
CNC router
Awesomness
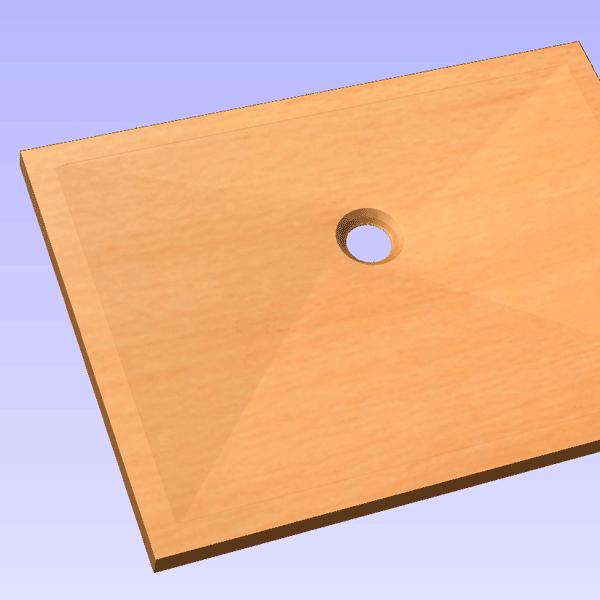
With the exact dimensions of a nicely priced stainless steel undermount sink as a guide (and a fallback plan) I designed a simple box sink.
The bottom surface of the sink would be made from a 1″ thick slab of walnut glued up to make a 16″x26″ board. I needed to design the shape of the bottom surface of the sink. Any 3d design software you are comfortable with can be used for this. I used an application with a “2 rail sweep” function. This allowed me to contour everything from the outside edge of the sink, down 1/2 inch, and to the drain at one smooth angle.
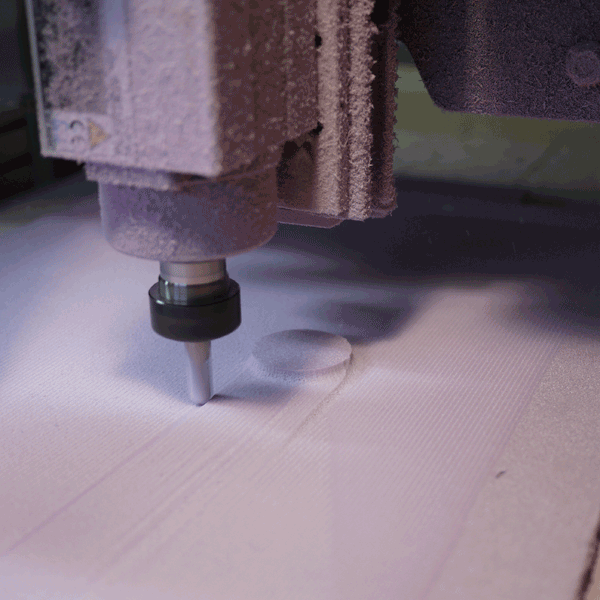
I tested my design in foam.
The foam test worked great so I moved on to the real thing.
After assembly, I installed the bathroom taps and the whole thing was coated in West System epoxy and polyurethane varnish to make it water tight. The finishing toolpath took 12 hours to complete on the shopbot with very little sanding to be done once the machining was complete.